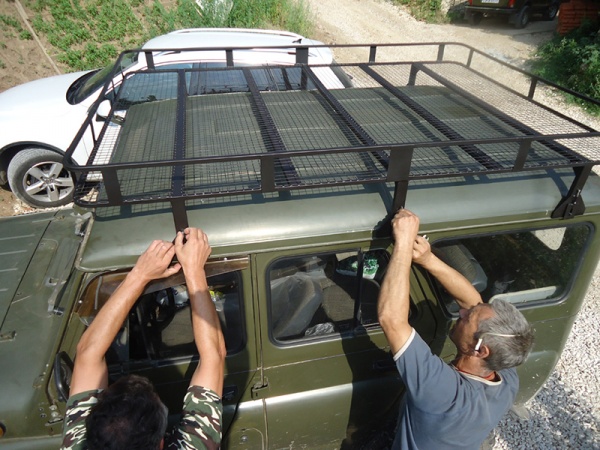
Homemade trunk for UAZ 469. DIY expedition trunk - more space in the cabin
UAZ 31514 ☆ⓇⒺⓃⒼⒺⓇ㋡ › Logbook › Expedition trunk UAZ 3151 (469) Do-it-yourself (part 1)
Good day to everyone who reads and clicks on my posts!
A long time ago I wanted a trunk for myself, but I couldn’t decide what I wanted and what functionality it would provide.
While I came up with and realized what I wanted, the situation on the foreign exchange market inflated prices to the point of disgrace. What are these prices for? from 6 thousand rubles to an inhumane 30 thousand.
We consulted with my brother (a fellow UAZ lover) and decided to do with our own hands what we wanted and according to our wishes.
A similar version was found where thoughts and desires coincided.
trunk functionality:
Work light (tank headlights front and Wesen optics rear)
"Branch cutters" (also known as "branch cutters")
Mounting for a shovel on one of the sides and Hijack
Carrying payload in small quantities, but carrying capacity will be with reserve
This trunk is used as a basis and layout
The dimensions were taken according to the parameters of the roof (and gutters), as well as the “expensive” trunks seen on the Internet. (more details about the finished version later)
And so in order:
We cook the base (draft version), which will be scalded.
Main racks
That's all for today.
Next, the rounded front and back parts will be welded onto the base. Then we'll start building the top of the trunk.
To be continued…
PS I will only say one thing: The cost of materials is less than 2 thousand rubles. The quality (welds and aesthetics) is no worse than “expensive” ones
Looking ahead, I will say that there are plans to put this craft on the conveyor belt
In parallel with the Expeditionnik, my brother is making a Power bumper for his UAZ according to his wishes
Also, after all the testing of fittings and installations, a possible contender for the conveyor.
Issue price: 1,850 ₽
almost two years ago Mileage 85200 km Tags: accessories
Comments 23
Participate in the discussion can only registered users.
Good evening, can you tell me the width of the roof based on the gutters, I did it only once, using old records I found 153 cm, I made a trunk using them, now I’m wondering whether it will fit or not, since I found a distance of 157 on the Internet... The only distance that came up in a search. Thank you.
Thank you, I already found out, 154)
Good day! I also made 153, but either it was welded crookedly, or the roof was wider, I had to adjust it to the location. I’ll say one thing, don’t baptize yet, only after a complete fitting
The trunk has already been painted, I made removable legs, with the possibility of slight adjustment. It's on the blog. The thoughts just didn’t give me peace :-)
It’s great that there are adjustments, but I did it far from the car and only based on reviews and sizes from the Internet. I also painted it right away, upon arrival at the car I had to cut it and digest it and bend it, but I’m guilty of the fact that I’m not a pro welder =) The only thing I’m very disappointed with is that the trunk almost lies on the roof, there’s a maximum of 5 mm of clearance, but it’s strong and does not sag, more than 300 kg were pressed on it on the press and at least it doesn’t matter to him =)) The machine is tall and touches deciduous and coniferous trees, from here a lot of garbage lingers on it
This is the first trunk on a UAZ that I did remotely, without having a car nearby, I usually do it for a Niva, but then they asked me :-) I looked up old records and found some parameters, the rest is just guesswork :-)
Good afternoon. Tell me the dimensions of the bumper with the kenguryatnik. I want to collect the same type
Hello, now this is very difficult, there is only one bumper. Made individually. And the car is too far away to take measurements from him
oh thank you, nice =)) for myself =)) but it will turn out well and I’ll do it for others
Full version of the site
http://www.drive2.ru
A car roof rack has a huge number of advantages. The main tasks it performs:
- Creates places for transporting additional things and accessories.
- Provides a base for installing additional lighting fixtures and also protects the roof from damage.
Speaking about the advantages, it is impossible to note the disadvantages of this design:
- The aerodynamics of the car deteriorate significantly, which leads to fuel consumption.
- In some cases, when serious mistakes are made, noise insulation and controllability deteriorate.
 Roof rack
 What is the trunk made of?
To make a luggage base with your own hands, you will need material for its manufacture. The best solution will become a metal whose weight is insignificant but durable. For the design, the best option would be:
- Aluminum.
- Stainless steel.
- Profile tube.
Many car owners believe that aluminum is a suitable material for making their own trunk frame.
Strong and flexible steel sheets - what else is needed to implement a high-quality design? The disadvantage is the weight, which significantly exceeds the weight of aluminum and the profile tube.
 Profile pipe
 A profile tube with thin walls is often used as a material for a “domestic type” trunk.
After choosing the right material for the structure, we move on to the stage of measurements and calculations with our own hands. Here the weight, dimensions, necessary elements for the future design and approximate cost are determined.
Taking measurements for the roof rack
First, measure the width and length of the car roof. Then we can use serial ones or make our own drawing, which takes into account:
- The basis of the design.
- Frame.
- Amplifiers for the structure (jumpers).
- Boards.
 Trunk diagram
 Manufacturing stages:

Attention: to avoid damaging the body paint during installation and operation of the structure on the roof, we glue special rubber bands under the mounting posts.
If desired, you can make additional parts for the Hunter that you will need during operation. For example, a streamlined front body that will provide better resistance when driving at high speeds.
Required tools:
- Drill.
- Bulgarian.
- Measuring equipment.
- Scissors.
- Welding equipment.
- Rubber.
- Cardboard.
- Adhesive composition.
- Dye.
 Trunk for UAZ Hunter
 Second manufacturing method:
- We take measurements on the Hunter roof with our own hands, using a grinder to make blanks for lintels from angle steel.
- We create a template of cardboard stands for installing the structure. First, we place the cut out template on a metal sheet, then we cut it along the edge.
- We install the cross member using welding. We take measurements on the roof to determine the stability of the trunk.
- Using cardboard, we create a new template that will reflect the shape of the side mounting holes of the trunk.
- We attach the structure to the roof for measurements. We mark the holes for the end fastenings of the trunk to the Hunter support struts. We take a drill and drill the previously marked places on the structure and use the drawing for verification. Install the mounting bolts.
- We use sandpaper to clean seams and other metal parts. Clean and allow time to dry after degreasing. To paint the structure, you can use either simple metal paint or a spray can, which will speed up the painting process itself, as well as the drying time.
What is the most important thing when traveling? That's right, the things you need while traveling should be at hand. But the question arises - where to load them? On regular cars there is a trunk for this purpose. What about the UAZ Hunter? It would seem that everything is in order here. Behind the rear seats there is a fairly large compartment where you can load anything you want. But... Most often it is used to create additional space. After all, a company usually goes on a camping trip in a UAZ Hunter, and the extra space in the cabin is used 100%. Where can I download the necessary “little things”? In other cars, the roof rack is used for this purpose. Is it worth it, and is it possible to do something in this regard on the UAZ Hunter? We need to figure it out.
Why is there a roof rack?
This is the simplest question. The car interior is usually full of people. Many people arrange a kind of “office” from the “aft” part with a folding table, a mini-bar and so on. A The UAZ Hunter, whatever one may say, is a car for hunting, fishing and long-distance travel. And here you need to provide for a lot, but you don’t really want to sit in the cabin resting your feet on a rolled-up tent, a fishing pot, buckets, and other things necessary for a real traveler. Towing a trailer? Well, some people do that too. But most resort to the old, proven roof rack.
Disadvantages of such a device
- Aerodynamics.
- Sustainability.
- Risk of loss.
Violation of aerodynamics, and as a result, increased consumption. This is the main argument. But honestly, we can say that aerodynamics is by no means the main quality of the UAZ Hunter. And a properly installed roof rack will not make it much worse.

Sustainability. Well, of course, if load 700–800 kilograms of equipment onto the roof, then there is no doubt. But if you approach this issue wisely and distribute the weight correctly, then its design stability will not even notice 2-3 centners on the roof. This also includes the risk of “loss”. Everything is in the hands of the owner.
Types of roof racks

Conventionally, they can be divided into three groups:
- Closed (streamlined).
- Open longitudinal.
- Transverse.
Typically, closed trunks are factory-made products made in the form of streamlined boxes, reminiscent of a boat.
Important! These are often used for foreign-made SUVs. They are beautiful and ergonomic, but most are very small in capacity.
Open trunks are the most popular. They are easy to manufacture and allow you not only to take more cargo, but also to position it more conveniently.
Longitudinal racks
This is a rather original option. There are always two arches located on the roof in the direction of travel of the car. If necessary, transverse beams are attached to them and a load is placed. It is secured with a special spring cable or strong cord.
Attention! The crossbars are secured using clamps built into them.
The longitudinal beams have a square cross-section and are firmly bolted to the roof of the UAZ Hunter.
Cross roof racks
This is, in principle, a well-known option for everyone. Removable versions are mounted in the same way on other types of cars that are not SUVs. The convenience of these units is that they are completely dismantled when they are not needed. In addition, they are usually much lighter than other options due to their design.
Of the minuses, first of all, it is necessary to note the great fragility of these roof racks. They are made from 2 materials:
- aluminum,
- thin steel rods.
The cross section ranges from 7 to 12 millimeters. They try to make these roof racks for the UAZ Hunter with their own hands, because it’s quite simple.
The shape of this part resembles a flat box made of walls consisting of thin elements.
Make your own trunk
So, the owner decided to show himself as a real traveler and make a place for transporting goods himself. Great. Where should I start?
Select the type of part based on the features listed above. Select materials and tools. And forward.
.jpg)
Tools
The set of materials is already known. Now regarding the tools. Here you will need to prepare:
- electric circular saw for metal;
- electric welding;
- sandpaper;
- hammer.
This is quite enough to make the device.
Attention! If you still decide to make a trunk with longitudinal fastening, you will need a drill.
Manufacturing process
Now the main thing is the correct calculation. Accurately measure the distance between the protrusions on the roof to which you can attach the rack. After this, cut from a rod with a thickness of at least 10 mm.
Two main arcs and weld fastening clamps to them. There is no need to be tricky with them. It's better to buy ready-made ones. After this, cut the pieces that will make up the “bottom” of this basket. Weld them at equal distances. Along the perimeter of the resulting “rectangle”, scald with a single rod and close. Now weld the same square (exactly this size) and weld it on thin connecting pieces. The length of these pieces will be the height of the side of the trunk of the UAZ Hunter. It remains to be carefully processed(after complete cooling from welding), and paint over it. For special connoisseurs, as an option, you can chrome plate the surface of the product. You can install it on the roof and try loading it.

Making a longitudinal trunk
Here, on the one hand, everything is even simpler. The tools are the same, only a square metal profile is used as the material, and two “arcs” are bent from it to be attached to the roof of the UAZ Hunter. Holes are drilled in the roof to secure the neatly flattened ends of these “arcs” having similar holes. After this, after “designer” processing, that is, painting, the arcs are tightly fixed in place.
After this, a frame is prepared that will be attached to these arches. This is a matter of the car owner’s imagination. In principle, there are no special restrictions here. The simplest and most popular option is a set of aluminum slats with fastening devices. When assembling, they can be placed with different distances between each other. Their convenience is that they are conveniently and compactly stored. You can do it right in the UAZ Hunter showroom. Well, as an option , you can make a removable basket based on the principle of a transverse trunk. The main thing is that the anchor points coincide.
By the way! Two transverse arcs can be positioned in a similar way, as shown with the factory-made option in the video.
Bottom line
In principle, there is nothing particularly difficult about making this device with your own hands. Well, whoever doesn’t want to spend extra hours fiddling with metal, welding and tools can easily purchase this “device” at any specialized automotive store. Or buy it in online stores. And install it yourself. Well, when the issue of additional cargo space on the UAZ Hunter is resolved, you can safely set off on an exciting journey, with confidence in your reserves.
And as usual, a useful video on this topic:
Hello everybody! My name is Gastinov Albert, I represent the online store “Podgotoffka.ru”.
Today I will try to tell you in detail about the expeditionary luggage racks we produce and additional accessories increasing its functionality.

“An expedition trunk is that simple device that sometimes carries the most valuable cargo on expeditions, tourist outings, or just family weekend trips into nature. Depending on the type of activity and your preferences, our company designs and produces a wide range of different variations of the appearance of luggage racks. Here you can find for yourself: compact luggage racks, for transporting small bags and small items; budget (amateur) luggage racks, which practically have no own weight and can be installed even on sedan-type cars; large racks installed over the entire roof area of your car.
In addition to the expeditionary focus of our luggage racks, there are also models that may be suitable for enterprises in the oil and gas industry, hydraulic industry, construction organizations that simply need to transport long items (pipes, boards, rolled metal, etc.) or for hunting or fishing trips so that you can transport the necessary equipment and prey.
In addition to the models we already produce, our company can produce trunks of any size and almost any shape according to your requirements.
Your fantasies and our capabilities are interesting options for development and additions to our products!”

The main task that falls on us as a manufacturer is not only high quality and beautiful, but also reliable. Reliability lies in the fastenings that allow you to secure the luggage rack basket to the roof of the car. We currently have three types of fasteners in our assortment:

Based on the dimensions, types and shape of the car roof, a trunk basket is selected. More often than not, our clients already buy ready-made solutions, i.e. fasteners and basket together from the presented model range on our website.
The trunk basket is made of steel pipe with a diameter of 20 mm, profiles 20x20mm and 20x40 mm, mesh with a cell of 20x20 mm. The entire structure of the basket is entirely welded, so the trunk frame is stronger and more reliable, unlike prefabricated products.
In the trunk basket, based on the model and make of the car, holes are drilled for bolts, grooves are milled in the fastenings to allow the fastenings to be adjusted in width. For mounting on roof rails, it is possible to adjust the length. This greatly simplifies the process of installing and choosing the location of the roof rack.

All products are sandblasted before painting (to prevent corrosion after painting). Then they go to the painting booth, where they are coated with powder paint. The main color of the coating of all products is black, because... goes well with almost any body color. If desired, of course, painting in other colors is possible, but these points are agreed upon individually with each buyer.
Our product range is not limited to roof racks and roof racks. All luggage racks can be additionally equipped with:
- Mounting for rack jack
- Spare wheel mount
- Attachment for ax and shovel
- QUICK FIST fastenings and their analogues
- Branch guards
- Net for securing cargo
- Tightening strap
- Additional optics
- Wiring kit for connecting additional optics
The list is not complete because The possibilities for implementing functionality are very, very large.
Let's look at them in more detail:
1. The mounting kit for the rack jack consists of two brackets that are installed on the trunk racks, as well as pressure plates and “wings” for securing the rack jack.

2. Spare wheel mount. Installed on pre-assigned places on the trunk. An insert with bolts is screwed into the trapezium of the bracket to secure the spare wheel. This insert allows you to adjust the height, which allows you to mount wheels of different sizes.

3. Attachment for an ax and a shovel. Can be installed anywhere and in any width, depending on the length of your tools.
4. When manufacturing a trunk, we always take into account all possible wishes of customers, so we can prepare in advance places on the trunk racks for universal QUICK FIST mounts and their analogues.

5. Branch cutters or branch cutters. This is a separate item of goods. Which can be purchased in our online store. There are a lot of advantages from such an inexpensive addition. Protection of the body, windshield from large tree branches and more brutal appearance car.
6. Branded awning. Simply a must-have for all travelers and lovers of long trips. The awning is made taking into account all sizes of the trunk, its shape and additionally installed fasteners. The awning will allow you to store all the things packed in the trunk, protect the bottom and frame of the basket from precipitation, snow, leaves and rain.

7. Using an elastic mesh or tie-down straps, you can secure high and bulky loads. This allows them to be immobilized and eliminate the possibility of moving around the trunk.
8. A waterproof luggage bag will provide convenient transportation of all your essentials, including food, clothing and bedding. Having very large dimensions, you have the opportunity to maximize the load on the trunk space in the car. The bag is made of waterproof material, which allows you to protect all your belongings from rain and snow.
9. All luggage racks of our production are equipped with places and brackets for installing additional light. Headlights and LED beams can also be selected on our website.

10. The wiring kit will allow you to easily install optics without going to different stores, with connections in different combinations. The kit is designed to connect 5 headlights, including LED beams.
When choosing this or that trunk, compare all your needs, choose the design you like, and the reliability of the design will be our responsibility, for which we are fully responsible!
Photos for the article were prepared by:
Pavel Maltsev “Podgotoffka.ru”
Anton Emelyanov “inPhoto.pro”
My friend Valery had a problem - a new roof rack, bought at a car dealership along with a UAZ Hunter, fell apart after the first fishing trip! Without stopping by home, Valery threw this “ruin” into my workshop with the words: “Please do it when you have time!” A few days later I examined this miracle of technology and became convinced of its complete stupidity. It was a prefabricated trunk made of rectangular and square pipes. The ears of its side pillars are made of steel sheet only millimeter thick.
The arrangement of the luggage area tubes is longitudinal-transverse, with M10 bolts fastening them together through the main transverse beams, which completely weakened them. The support nodes of the transverse beams turned out to be wider than the places of attachment to the UAZ roof by as much as 20 mm.
In the process of disassembling the trunk into components, I became confident in the need to completely remake it from a collapsible one to an all-welded one...
To do this, I cut off all the threaded bushings welded to the tubes and straightened the tubes themselves. Then I first assembled the supporting transverse beams with racks using welded “tacks” from standard parts, keeping the size between the last 1520 mm, and finally welded the seams. I connected the resulting beams with spars and, having precisely checked the rectangularity of the frame (or base) of the future trunk using “diagonals,” welded one to the other. Having received a strictly rectangular frame, I welded additional cross members between the beams, and along, in the middle between these elements, I also installed spacers using welding.

1 – outer support transverse beam (pipe 40x20x2.2 pcs.); 2 – middle supporting transverse beam (pipe 40x20x2); 3 – additional cross member (pipe 20x20x2.2 pcs.); 4 – spar (pipe 20x20x2.2 pcs.); 5 – spacer (pipe 20x20x2.4 pcs.); 6 - inclined support (pipe 40x20x2, 6 pcs.); 7 – vertical support (pipe 40x20x2.6 pcs.); 8 – high side wall (pipe 20x20x2, 2 pcs.); 9 - inclined stand of the high side wall (pipe 20x20x2, 2 pcs.); 10 – low sidewall (pipe 20x20x2, 2 pcs.); 11– inclined stand of the low side wall (pipe 20x20x2, 2 pcs.); 12– tailgate (pipe 20x20x2); 13 – rear rack (pipe 20x20x2.3 pcs.); 14, 15, 16 – M10 bolt with flat and spring washers (6 sets); 17 – support rod (circle 5.6 pcs.); 18 – threaded bushing M10 (circle 16, 6 pcs.); 19 – clamp (steel sheet s3.6 pcs.)
I made the side and rear sides from suitable pieces of purchased “construction set”. I welded support rods to the flattened ends of the vertical posts on the side. After the final welding of all the seams, I made a final straightening of the frame and cleaned up the welding seams. The clamps were made without modification, however, they could have been made independently.
In conclusion, the new trunk should first be coated with a gray primer and then painted with silver, but the owner himself took on this work, so the “memory photo” shows the trunk without any coating.